Wednesday, June 30, 2010

Roadkill Rescue: Chair

So, I was driving down the road and I saw this beauty sitting on the side of the road, ready for garbage pickup. What? This sweet little chair with awesome potential? Helloooo, someone needed to save her! So I promptly kicked the BF out of the car to go grab her, because I sure as heck wasn't going to be seen doing it! Actually, I was driving, so it was just easier for him to do it...or that's what I told him.
Isn't she great? I called my Mom soon after, I knew she'd be so proud of me! I knew exactly where I wanting to put the sweet thing, so I got to work on this super easy project. First I had to remove the one lonely arm by unscrewing it from the base. I took off the plasticy cover to see if the padding was still good on it, and luckily for me, it was! I cut the fabric a little bigger then the seat and stapled it to the bottom, making sure to fold the edges neatly.
Then, I took her outside and gave her a nice coat of Krylon Brown Leather spray paint.
So simple! But such a transformation!
Perfect! Now she really is a beauty!

Tuesday, June 29, 2010

My Bathroom Redo

So one of my big projects for this summer was to redo our master bathroom. There are no upgrades whatsoever...just factory grade. When we bought the house, we kind of liked the idea of being able to refinish everything at our pace, making it the way we liked, and being able to spend what we wanted.
This was after I painted the bathroom, and decorated it.
We have the big sheet mirror, plain boring ole cabinets with nothing on them, and don't forget.....dum dum dummmm......GLOBE Lighting! Yuck!! I hate those things.
Drab, drab, drab. I had heard of framing the mirror before, but I was just going to get plywood when I came across this tutorial at Show & Tell and I knew I found what I was looking for. She gives you step-by-step directions on how to get your molding up. Base Molding, can you believe it? Base molding is the perfect solution for framing the mirror. It gives it some detail, but is still thin enough and light enough to not knock the whole mirror down. So, I got to work!

So it's hard to take pictures of my bathroom! But it makes it look so fancy! I also sanded and painted the cabinets the same color as I did the molding. I want to add knobs to my cabinets, but I haven't been able to find exactly what I am looking for yet, with a small price tag!
Loove! I did run into a...small...problem (who doesn't?).
When we removed the gross globe lights we found this underneath.
Ahh! Is that up to code? It doesn't look big in this picture but that hole was HUGE! It was bigger than the frame of the new light that I bought. So, what's a girl to do? Well, you get agitated and pitch a small hissyfit in the bathroom by yourself, then politely go ask your BF to PLEASE HELP! Then he, being the handyman he is, comes up with a nice little solution. He cut a thin board and screwed it into the studs so that  it would cover the hole. I then painted the board the same color as the wall. Fixed! Hissyfit over! Thanks BF!
 
See you can't even see it...barely!
Hopefully soon I will be able to change the faucets. Yay new bathroom!

Thursday, June 24, 2010

Giddy!


You know when you have an idea floating around in your head and you think that there is no way that it will ever work out? Well.... this time, it did! And I'm super giddy about it. There's such a good feeling about looking at something and knowing that you created it, made it, and it actually looks good!
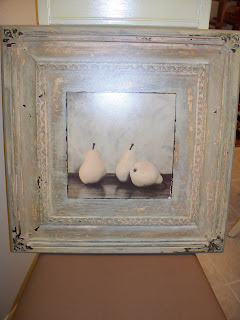
I've been searching for some kind of art work to go in my dining room, with no luck. I knew the look I was going for, but I couldn't find anything to match it. Well, my friend Kristen had this art piece sitting in her garage and she didn't want it. She asked me if I wanted it (THANK YOU!) and I figured I could come up with something to do with it. Now... I'm sure there is some pear-loving, muted-colored, fancy-art loving person out there that is just yelling at me through their computer that I painted on top of this, but... I'm not one of those people...so....sorry!!!
That is what I started with. I was going for a rustic look..and here is how I got it.
First, I gave the piece a light sand so that everything would stick. I painted the edges and center portion brown (espresso bean to be exact).
I wanted the center to look rustic as well, so I painted on a crackle finish. I added a deep red (wine) paint on top of it, but left parts of the brown coming through, almost a streaky effect here and there.
I wanted a woodsy outdoorsy rustic feel...and I knew I wanted to use wood, but man that would be a lot of work! Well...believe it or not...I found some PAPER that looks just like wood. Very realistic! Paper people! I cut it to fit around the middle portion and used my Mod Podge to glue it and seal it. I used a Walnut Stain ink to distress the edges and then inked different parts of the paper, like real wood would have on it.
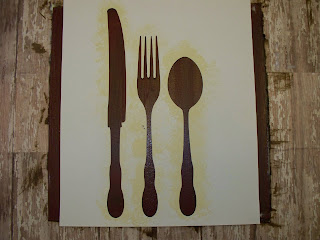
And now the FUN! I bought a SILHOUETTE!!! You've seen them if you've been reading the blogs. They are the newest and most amazing cutters out there! They can do so much stuff. I got mine after the first blog reader discount hit the stands, over at How Does She? It was such a good deal! OK...sorry...back to the project! I used my silhouette to make a stencil on cardstock of a set of silverware. I crumbled up a plastic bag and just lightly dabbed it with some antique white paint to stick with the rustic feel.
Silhouette Design Silverware_0772 
Now..stick with me..I thought I was done, but then decided that it needed something...so here is where my brain got to turning. I wanted to add burlap to cover up where my paper met on the sides. When I put it against the wood paper, it just didn't have enough contrast. So, I got creative. I cut pieces of red burlap to fit underneath my neutral burlap and used spray adhesive to attach them. I'm not sure if you can tell from the pictures, but it just gives it that little bit of contrast that it needed, and blends really well with the color in the middle.
To polish off the edges I added my jute (helloooooo, obsessed!) with spray adhesive to make the burlap look straight. And here she is... isn't she purty?
Giddy, people, giddy!!!! I smile everytime that I look at it. That's the power of crafting!
Join us Saturdays at tatertotsandjello.com for the weekend wrap up party!UndertheTableandDreaming Funky Junk's Sat Nite Special


Monday, June 21, 2010

Vase--Paint Redo

So I've had this vase just sitting in front of my fireplace for probably two years now...
To tell you the truth, I've never liked it..never..but I just always had it sitting there because that's where it fit the best. The thing I hated the most about it..was...the black hole!
So today I decided to redo it.
I squirted my paint on a paper plate and bunched up my plastic bag. I dabbed it in the paint and then around the plate to just get a very light coat on the bag. Then, I started dabbing my vase all over. I wanted the pattern to be sporadic, but I needed the first coat to cover the base color.
After I got a good coat on the vase I used my second color (green) using the same technique. I just dabbed my bag back and forth all over the vase. The greatest part about this technique is that you really can't mess it up! If you notice one part has too much of one color, use your other bag and dab a little of the second color there. Just go back and forth until you like what you see.
You can play with how much paint you put on your bag. Use varying amounts to give your surface different textures. I like the way the bag leaves the paint looking. Once I was happy with my paint I decided to refinish the top of the vase. The before was a ceramic version of a type of twine-look. So, I used the same method as here and wrapped my jute around the top, securing it with Elmer's Glue.
I think it fits my space much more nicely then the ugly black hole did before! And I'm digging the texture on it...which unfortunately can't be seen by my photo, but trust me, it's great!

Sunday, June 20, 2010

Freecycled Summer Wreath

I decided that it was time to make a new wreath for our front door. I wanted something fun and colorful for summer. I grabbed some *inspiration* from my most favorite blog, Tatertots and Jello.
I used parts of her Whimsical Spring Wreath and Burlap Wreath and combined it with some inspiration from Amy's Freecycled Napkin Rings from Positively Splendid.
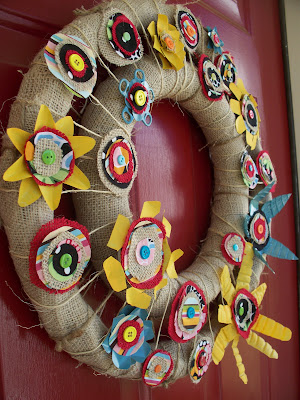
I started with a Dollar Store Wreath Form and wrapped about a 2-inch section of burlap all the way around and glued it with good ole' Tacky Glue.
As I started making my flowers I decided that my wreath form was too skinny. So, how was I to beef that bad boy up....Ah, ha! I added my smaller wreath form from this tutorial I showed you. I used my jute and sisal from this tutorial and attached it all the way around. Now, it does look a little wonky...but, sometimes I like the way wonky looks!
After this came the FUN part, making all the different kinds of flowers! I used soda cans and water bottles to make all the different types of flowers.The cans were easy to cut with just regular scissors, and I hot glued the different shapes to one another.
Then, I spray painted some with my ocean breeze paint and painted some others by hand with some yellow acrylic paint that I already had. Then, I cut out some different sized circles of burlap and fabric that I had bought for a failed project..... that's just not finished yet. I attached the circles with hot glue.
I added my flowers to my wreath with hot glue, and I sure do love it! I love how the roughness and craziness of the two forms looks with the bright colors and cutesy fabrics. It's super kooky..but I'm realizing that I must be a little kooky myself to like such things!
Love, love, love, love, love, love it against my red door! And the best part is that I had everything except the $1 wreath form. So, a super fun, kooky, wreath for $1! You just can't beat it!
Join us Saturdays at tatertotsandjello.com for the weekend wrap up party!UndertheTableandDreaming


Funky Junk's Saturday Nite SpecialMakingVisit thecsiproject.com

 
giveaways